Pages

Friday, January 17, 2020

My first Valentine of Year 2020


So I actually didn't have a Valentine sentiment, so I improvised.  I am traveling right now and realized I have no Valentine's Day anything with me!  However, the red roses in the vases and the pretty colors and scripty background does the trick.  When I write out the inside of my card I can add all the extra stuff!

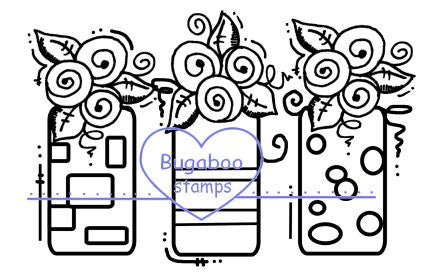
I'm kind of crazy over this image: Rose Vases

Here's what it looks like uncolored:


Thanks for stopping by! Now off to my craft room to create some more Valentine inspired projects!

Bugaboo 10th Annual Down on the Farm Birthday Bash!

Hi everyone!  Today I'm creating 1 post and linking all my projects using Bugaboo Digi Stamps to help them celebrate their 10th Birthday!  I'll link each card to that particular day's challenge.  You still have a few days to participate and make sure to check out today's Freebie, which I created a card with, as you'll see..so keep scrolling and I hope you enjoy my creations using Bugaboo images!

To see an overview of ALL the challenges, CLICK HERE!


I colored up the bobblehead farmer, cow and chicken for this one!  Don't you just love png. files that layer?!


Here's my spin on the sketch using Cownt Your Blessings Image


So I created a tag using a new image, Udderly Amazing


So


I created a winter birthday card using Winter Birds Digi image


I used the Bobblehead Chicken and this funny Bugaboo sentiment!


I tried to capture most of the colors in this scheme, but you also have to use what you have, right?  I used the Bobblehead Farmer and Cow and stamped my Happy Birthday inside the card.


I used what I had for this challenge, drawing inspiration from the photo the best I could. I did use today's Freebie to create my final card for this weeklong birthday bash!


Thanks everyone, I hope you like my projects using Bugaboo Digi images!  I had lots of fun coloring and creating!  Now to get entering them into all 7 days of challenges!


Saturday, January 11, 2020

Bugaboo January FB Fan Freebie 2020


Hi everyone! Happy New Year to all.  I'm staying a while in Chicago and enjoying this gorgeous winter weather. I've got a hot cup of tea and everytime I look out the window I see all this beautiful snow falling!  What a perfect day to craft!

I love this new freebie Digi image from Bugaboo, what do you think? You can find this freebie by joining the Bugaboo Fan Club Facebook Page.  Free for members in the month of January.  Follow this link to join!


I colored the cake in Neopolitan flavors with my Arteza alcohol markers, then die cut the image using Sizzix Postage Stamp Dies.  I cut my card base a different size than usual in order to layer. It's an A6 size 4.5"x6.25".  I added a buttery yellow and a gorgeous deep red polkadot layer under that. I tied some twine and added a few enamel dots in dark gold. The sentiment is by Unity Stamps, part of the Funny Farm kit.

I don't have a place to photograph my cards as easily right now, and the skies are pretty grey. IRL, the colors are a bit brighter, but I still think it turned out pretty enough to share!

While traveling, I've been coloring more of my digi stamps lately.  I've got a whole folder of them I'm working on.  What are some of your favorite digi companies?  Feel free to share in the comments and thanks for stopping by!

Thursday, December 19, 2019

Newton's Nook Designs Frosty Folks


Hello everyone, I sure have missed making cards to share with you, so I decided to write a blog post before Christmas to say hello and share a project I made with some new Newton's Nook Designs products.  

To begin with, I couldn't contain my excitement when I saw the brand new Mountain Stencil released in November.  I live in the foothills of the Appalachians and the views I see from my backyard are stunning.  However, heading up to higher elevations and seeing the mountains from a lookout point is truly spectacular and now fairly easy for me to recreate the look using this stencil.  So, needless to say I've got a lot of future plans for this mountain stencil!

For my background, I started by heat embossing a few snowflakes included in the stamp set.  I always do this first before inking. Then I chose a variety of purple and blue inks, starting at the top and working my way to the bottom, I created numerous mountain ranges and left the bottom white for the snowmen to sit on a bed of snow. I decided to add some extra flakes with my white gel pen and love how that turned out!


I then foam popped up this ADORABLE snowman image, Frosty Folks, which I Copic colored.  I enjoy coloring snowmen with striped hats, top hats, vests and patterned scarves. So this set was for me.  Plus, I love the versatility of being able to use this set all winter long.


I've linked up both Newton products used, for your browsing/shopping convenience. Thank you so much for stopping by!  I hope you enjoy your holidays in whatever special way you choose to celebrate! 


I've entered this project in the following challenges:


Tuesday, November 12, 2019

Entry for the Inky Paws Challenge #110 for Newton's Nook Designs


Hello everyone, it's been a few months since I've done any papercrafting/blogging.  I really have missed sharing with you, but sometimes life is that way. I've been going through some personal things and I struggled to feel creative.  I know that everyone goes through hardships and it's really ok to step away if needed for our own peace of mind. Thankfully my stamps and dies were waiting for me and I truly enjoyed creating this card!

While I am missing designing cards so, so much..I've decided that for now, it's better for me to craft for the personal fun of it. So I hope you'll continue to follow my blog and leave a comment whenever you're so inclined.

With that all said, I thought I'd share with you one of a few cards I made this week with a personal favorite winter stamp set from the Newton's Nook Designs line.  I decided to enter the Inky Paws Challenge which is a color challenge this time.  I'll post links below in case you'd like to join me.

Thanks so much for stopping by!  In friendship ~ Amanda

Copic Colors used:

G12, G21, G24, G29

B000, B01, B04

YR68, Y38, Y35

RV29, RV25, RV23, RV21

C2, C0, C00


Friday, September 13, 2019

Newton's Nook Designs Mini Release


Hi all and welcome to our Mini September Release here at Newton's Nook Designs.  I'm so excited to share this new stamp/die combo Sunflower Days and the new Gingham Stencil!
I used some Fossilized Amber Distress Ink by Ranger and with my blending sponge, went over the stencil with yellow cardstock to do a tone on tone blend. Then I used some Chipped Sapphire Distress ink on the little rectangle background with some white splatter.  I foam popped up the Sunflower Days stamped Die cut after I copic colored the image.  I absolutely adore this stamp, I hope you like it too!  Keep scrolling for your chance to win this mini release!
Copic Colors
Sunflower - Y11, Y15, Y19, YR24, E17
Center of flower - B91, B95, B97, B99, B39
Leaves - Y02, YG17, YG97, G99, YG25


Would you like to win this whole new Mini Release? We are giving a prize pack that includes the “Sunflower Days” Stamp and Die Set and the “Gingham” Stencil ONE lucky winner! Here's how to win: 
Comment on the NND blog and Design Team blogs (see list below)! The winner will be chosen at random from the collective posts. Make sure to check out each of their blogs and comment for your chance to win. You will not know which blog has been chosen so the more you comment on the better your chances are of winning! You have until Sunday, September 15th at 9pm EST to comment  -- winners will be announced on the blog post on Monday, September 16th. 
Check out all the awesome Design Team Blogs below to enter:

Amanda Bodine - You are Here

Friday, August 30, 2019

Newton's Nook Designs - Spooky Street


Hello everyone and happy Friday, I hope you're all looking forward to a nice weekend!  Today I'm here with a fun and spooky card I've made using some awesome Halloween themed products by Newton's Nook Designs

I started by using the hills side of the Hills & Grass Stencil in Brown and then stenciled the Ghonsts over the top of my blue inked background. I then stamped the tombstones along the top of the hill.  I added that great spooky tree and the skeleton cat and my sentiment.  

This is a really easy card to make, I hope you'll give it a try too!  Thanks for stopping by today!  Happy Haunts!

Products Used: Spooky Street Stamp Set